Now that we've taken a look at the preset types let's see how to apply them to create a timeline:
To create a timeline click New Timeline and a fresh set of blank rows will appear to the right of each Browser entry. Use the Timeline Properties pane to name the timeline, the default length of which is 5 minutes which can be changed using the Length text box as required (timeline length is really just a user interface setting and can generally be left at the default value).
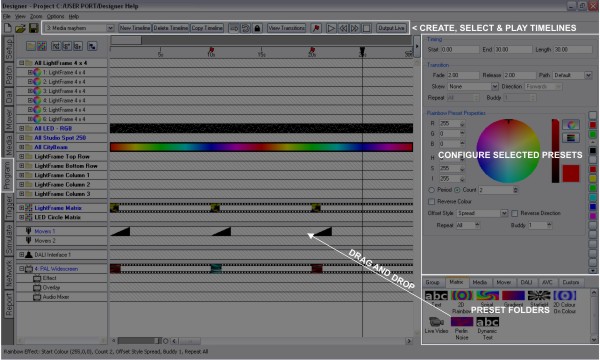
There are five categories of timeline row which determine the preset type that can be deployed on them:
The majority of the timeline rows will be your groups of fixtures, the all groups created by the system as you added fixtures and the groups you made to organise your programming. Only Group presets can be applied to this category. Click the plus sign to expand a group and expose its members:
![]() A fixture, or element within a compound fixture, capable of colour mixing, for example an RGB LED or automated light with CMY colour mixing. Use the Group colour presets to set static or dynamic intensity and colour.
A fixture, or element within a compound fixture, capable of colour mixing, for example an RGB LED or automated light with CMY colour mixing. Use the Group colour presets to set static or dynamic intensity and colour.
![]() A fixture incapable of colour mixing, for example a conventional light with/without a scroller or automated light with only a colour wheel. Use the Group intensity preset to set static or dynamic intensity. Create Mover presets to control the scroller or colour wheel as required.
A fixture incapable of colour mixing, for example a conventional light with/without a scroller or automated light with only a colour wheel. Use the Group intensity preset to set static or dynamic intensity. Create Mover presets to control the scroller or colour wheel as required.
These are the Pixel Matrices created in Setup and Media, only Matrix, Media and Custom presets can be applied to this category. In many ways, creating matrices and working with these powerful presets is the preferred way to go with Designer.
Unlike the categories above these rows do not specify a fixture selection but are instead simply a placeholder for any Mover presets created in the project. The fixture selection is a property of the Mover preset depending as it does on the fixtures selected when the preset was created. More rows can be added as required by right-clicking in the Browser and selecting New Movers Row, similarly to remove them.
These rows are for the DALI ballasts and groups and will only appear if some DALI fixtures have been added to the project, see DALI. Note that each DALI interface has its own set of rows due to the restrictions of the DALI standard. Only DALI presets can be applied to this category.
These rows are for AVCs and will only appear if audio visual devices have been added to the project. Only AVC presets can be applied to these rows, see Working with the Audio Visual Controller.
While the Latest Takes Precedent system determines what should be rendered and output as presets come and go over time, it is the order of the rows that determines what should be rendered and output should two or more presets with fixtures in common start simultaneously, with rows higher up the list taking precedent.
For example a fixture may be a member of two groups with a preset applied to both starting at the same time. In this case the fixture will render the preset for the group higher up the list. Groups can be reordered in the browser simply by dragging them to new positions.
Accordingly, simultaneous presets placed on groups and fixtures have a higher priority than presets placed on matrices.
The Browser toolbar provides controls for expanding and collapsing groups and compound fixtures as well as highlighting rows with programming. The Browser provides useful feedback as to which rows contain programming; elements, fixtures and groups will be displayed in blue, compound fixture or group headings will indicate the presence of any programming on members even when collapsed.
Expands all compound fixtures and groups so that all element (pixel) rows are displayed. Items with programming will be shown in blue.
Expands only groups so that all fixture rows are displayed. Items with any programming, even on a concealed member, will be shown in blue.
Collapses all so that only group rows are displayed. Groups with any programming, even on a concealed member, will be shown in blue.
Use this filter to hide all the unused rows, press again to turn off. Only items with any programming, even on a concealed member, will be shown in blue.
The timeline picker on the toolbar will be populated with every timeline in the project, select from the pull-down list to open a timeline for editing. Use Ctrl (Apple) + Tab to select the next timeline, Shift + Ctrl + Tab the previous.
Timelines can be copied using the Copy Timeline button, the copy is a brand new instance that operates independently, useful for creating similar timelines.
Timelines can be deleted using the Delete Timeline button, a warning dialog will you prompt you to confirm. Note that there must be at least one timeline in the project.
There are two ways of maintaining a timeline’s output beyond the end of the last preset. This is a particularly important feature for architectural use where a simple wall panel could be used to recall “scenes” at random which would remain active indefinitely until another is recalled:
Press the Hold button to prevent the timeline from releasing at the end (the default). Presets will remain active until overridden, effects and media will continue to play. Press the button again to reinstate the release.
Press the Loop Timeline button to make a timeline loop indefinitely. This is useful if you want to loop a sequence of presets. Press the button again to remove the loop.
It's also worth noting that a Timeline Running condition won't detect timelines that are holding at end. A Timeline On Stage condition will detect a looping or held at end timeline as long as the timeline is affecting the output of at least one fixture. Timeline Started and Timeline Ended triggers will match whenever a looping timeline loops. A Timeline Ended trigger will never match a timeline that is holding at end.
NOTE: Projects with lots of timelines set to Hold or Loop can eventually overwhelm the Controller(s) if these timelines are not explicitly released when no longer required.
Flags can be dropped onto timelines for use with triggers to create more complex presentations; perhaps incorporating remote sensors and conditional logic or triggering show control or AV equipment.
To set a flag, press the Add Trigger Flag button and drop it onto the timeline ruler at the required position. Hold down Ctrl (Apple) while pressing Add Trigger Flag to drop multiple in a single session, press the button again to finish.
To move a placed flag, drag it along the timeline ruler. To remove a placed flag, right-click on it and select Delete Flag.
Use the Triggers window to determine what these flags will do.
When simulating a single timeline, flags can be dropped interactively after pressing the Add Trigger Flag button to enter learn timing mode. Press F to drop a flag at each appropriate playback time then depress the Add Trigger Flag button to exit learn timing or click anywhere on the timeline (in which case a final flag will be dropped).
When clicking on presets to edit their properties it is sometimes all too easy to move or stretch them by accident so it is possible to lock a timeline using the Lock button on the timeline toolbar. When a timeline is locked it is only possible to edit the preset properties, moving or stretching them is prohibited. Press the Lock button again to unlock.